Difference between revisions of "User:Daly"
(→Overview) |
(→Overview) |
||
| Line 11: | Line 11: | ||
* Streamline data analysis with: | * Streamline data analysis with: | ||
| − | **flexible import options that support merging files from various sources. | + | ** flexible import options that support merging files from various sources. |
| − | **support for a variety of genomic data including microarrays, sequences, pathways, networks, alignments and phenotypes. | + | ** support for a variety of genomic data including microarrays, sequences, pathways, networks, alignments and phenotypes. |
| − | ** | + | ** access analyses with biological annotations from the National Cancer Institute. |
* Community: decribe this aspect | * Community: decribe this aspect | ||
Revision as of 10:38, 16 February 2006
Contents
- 1 Overview
- 2 Tutorial
- 2.1 Before You Begin
- 2.2 Getting Started
- 2.3 Loading Data
- 2.4 Working with Marker and Phenotype Panels
- 2.5 Visualize Gene Expression
- 2.6 Filter and Normalize Data
- 2.7 Clustering Gene Expression Data
- 2.8 Differential Expression
- 2.9 Regulatory Network
- 2.10 Integrated Annotation Information
- 2.11 Enrichment Analysis
- 2.12 Sequence Analysis
- 2.13 Pattern Discovery
- 2.14 Promoter Analysis
Overview
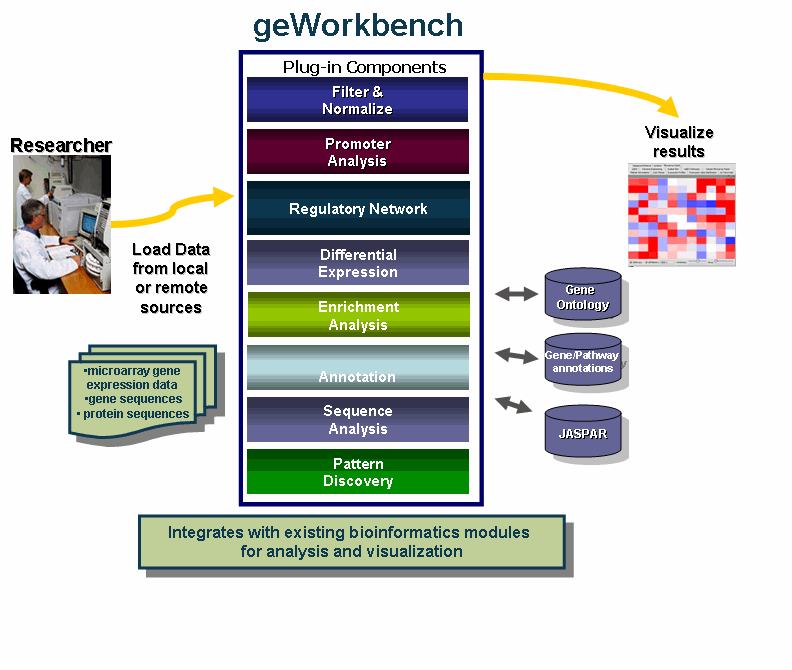
geWorkbench is an open-source bioinformatics platform that offers a comprehensive and extendible collection of tools for the management, analysis, visualization and annotation of biomedical data. This tool is aimed at providing researchers a centralized repository for the data analysis and visualiztion of gene expression data, gene sequences and protein sequences.
What can you do with geWorkbench?
- Use one program that intergrates with multple existing bioinformatics modules for analysis and visualization.
- Access remote servers and clusters for the performance of computationally intensive calculations - quicker!
- Streamline data analysis with:
- flexible import options that support merging files from various sources.
- support for a variety of genomic data including microarrays, sequences, pathways, networks, alignments and phenotypes.
- access analyses with biological annotations from the National Cancer Institute.
- Community: decribe this aspect
- Insert developer benefit ( plugin)
Tutorial
Welcome to the geWorkbench tutorial.
In the following tutorials, you will learn how to use geWorkbench. While reading the tutorials, when you see numbered steps like the follwing, it us an instruction for you to follow.
- Click on Submit.
- Close the window.
Before You Begin
These tutorials assume that you have sucessfully completed the installation instructions. If you haven't installed all the progam, please go back and follow the installation instructions.
Getting Started
- Starting the application
- GUI elements
- Panels
- Navigation
Loading Data
- Data formats
Working with Marker and Phenotype Panels
Creating Panels
Before you can continue, geworkbench should be running. For help with this, plese refer to the Getting Started section.newline
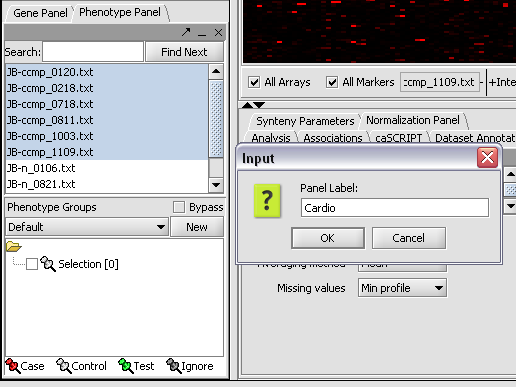
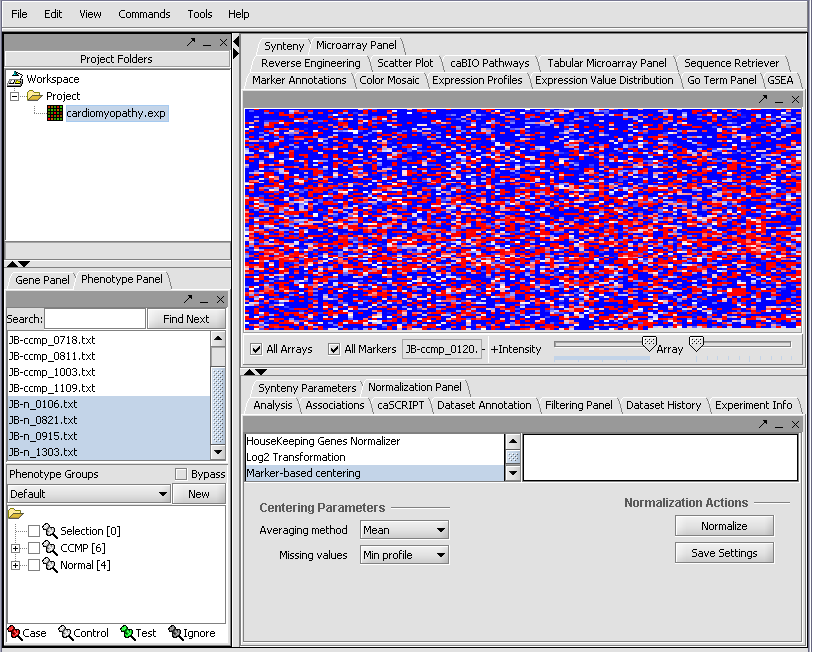
We can now assign phenotypes to each chip. We will place the phenotypes in the default group, however you can create new phenotype groups by pushing the New button on the Phenotype Panel at lower left.
Here we select and label arrays in the Phenotype Panel which contain samples from the congestive cardiomyopathy disease state...
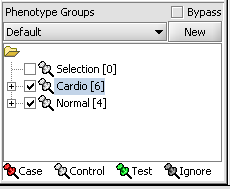
Next, we can similarly label the remaining arrays as "Normal". We have also checked boxes to indicate that these groups of arrays are "Active". Various analysis and visualization components can be set to only use/display activated arrays or markers.
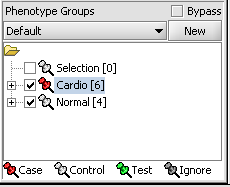
For statistical tests such as the t-test the Case and Control groups can be specified. This is done by left-clicking on the thumb-tack icon in front of the phenotype name. Here we are specifying the disease arrays as the "Case". The remaining "Normal" arrays are by default labeled control.
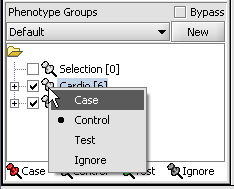
A red thumbtack indicates the arrays have been specified as "Case".
Visualize Panels
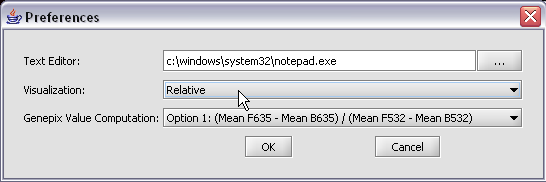
Here we select the relative display type.
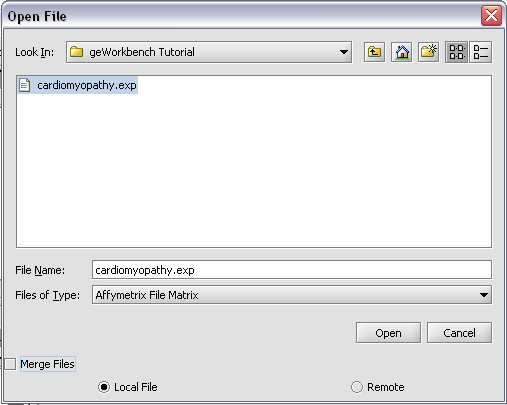
Returning to the Open File dialog as we before by right-clicking on the project entry, we will select the "cardiomyopathy.exp" file we previously saved...
Resulting in the following colorful display of the array data for the first array....
Visualize Gene Expression
Visualization tools provide a view of the chip(s) under investigation and can be used for ascertaining the quality of the data. The phenotype and gene panel can be used to limit display. The images can be saved and exported.
The Microarray View can be used to inspect each separate microarray using the scroll bar.
(insert image)
The Tabular Microarray Panel can be used to see data in spreadsheet format. One row is created per individual marker/probe and one column per microarray.
(insert image)
Color Mosaic Heat maps for microarray expression data, organized by phenotypic or gene groupings.
(insert image)
Expression Profiles This is a line graph of genes expression profiles across several arrays/ hybridizations. (insert image)
Expression Value Distribution (EVD) A distribution plot of marker expression values across one or more microarrays.
(insert image)
Scatter Plot A pairwise (array vs. array and marker vs. marker) comparison and plotting of expression values. (insert image)
Filter and Normalize Data
Normalize
Normalization can be used to decrease the effects of systematic differences across a set of experiments. In geWorkbench, normalization results in replacing values with new values.
Available geWorkbench normalization methods:
| Normalizer | Description | |
|---|---|---|
| Missing value calculation | Replaces every missing value with either the mean value of that marker across all microarrays or with the mean measurement of all markers in the microarray where the missing value is observed]]) | |
| Log2 Transformation | Applies a log2 transformation to all measurements in a microarray]]) | |
| Threshold Normalizer | All data points whose value is less than (or greater than) a user-specified minimum (maximum) value are raised (reduced) to that minimum (maximum) value]]) | |
| Marker-based Centering | Subtracts the mean (median) measurement of a marker profile from every measurement in the profile]]) | |
| Array-based centering | Subtracts the mean (median) measurement of a microarray from every measurement in that microarray.]]) | |
| Mean-variance normalizer | For every marker profile, the mean measurement of the entire profile is subtracted from each measurement in the profile and the resulting value is divided by the standard deviation.]]) |
(insert image)'
Filter
Filtering can be used to screen out missing data points, remove low quality data or reduce the size of the dataset by removing less interesting data.
Available geWorkbench filter methods:
- Missing Values
- Deviation
- Expression Threshold
- Affy Detection
- 2 Channel Threshold
[[[[{|style="border: 2px solid darkGray"
!|Description||]]]]
|-
|-
|-
|Affy Detection Call||Applicable to Affymetrix data only. Sets all measurements whose detection status is any user-defined combination of A, P or M as missing.]]) |-
|Missing values ||Discards all markers that have “missing” measurements in at least n microarrays, where n is defined by the user. Another filter must first be applied however, in order to generate the missing values upon which this filter can operate.]]) |- |- |-
|Deviation ||Sets all markers whose measurements deviate below a given value across all microarrays as missing.]]) |- |- |-
|Expression Threshold ||Sets all markers whose measurements are inside (or outside) a user-defined range as missing.]]) |- |- |-
|2 Channel ||Applicable to 2-channel arrays (Genepix) data only. Defines applicable ranges for each channel, and sets all values for which either channel intensity is inside (or outside) the defined range as missing.]]) |- |-
|-
|}
(insert image)'
Clustering Gene Expression Data
- Hierarchical Clustering
- Self Organizing Map (SOM)
Differential Expression
T Test
Differential expression using t-test.
In this test, the data are divided into two groups, case and control. The t-test asks, for each marker, whether there is a significant difference between the two groups.
- Create a new project ( DESCRIBE)
- Right click on the project, select Open File.( DESCRIBE)
- Activate the arrays to be included in the t-test, highlight the two phenotypes and right click, then select activate. Only data in active panels will be used in differential expression.
- Mark the cardio phenotype as case. By default, panels are marked as control.
Perform the following steps to mark case:
- Right-click on Cardio phenotype.
- Select Classification.
- Select Case radio button. In the Phenotype panel, items marked Case are shown with a red thumbtack icon.
- From the Analysis Panel, select T-Test Analysis.
- Populate the parameters values.
- In Alpha-corrections tab: Just Alpha.
- In P-Value Parameters tab: p-values based on t-distribution. Note that the default alpha (critical p-value) is set to 0.01.
- In Degree of Freedom tab: Welch approximation - unequal group variances.
- Click on Analyze.
T-Test Results
Switch to the Gene Panel. The markers which met the significance test are included in a new panel called “Significant Genes”.
- Note that this new panel of genes is active.
The values of the T-Test can be seen in the Color Mosaic panel. Perform the following steps to modify the default view to view the results:
Uncheck All Markers so as to include only markers in the active panels. Uncheck All Arrays (though here it will have no effect as all arrays have been activated in the Phenotype Panel).
Click on All to display the markers in Significant Genes Panel ( the active Gene Panel from the t-test). The p-values from the t-test are also shown.
The gene height and width values can be altered to make the display more readible.
- Multi Test
- Volcano Plot
- Color Mosaic
Regulatory Network
- Reverse Engineering
- Cytoscape
Integrated Annotation Information
Enrichment Analysis
- Go Term
- Go Miner
Sequence Analysis
- Sequence Retrieval
- Sequence Homology Analysis
- Blast
- Other
Pattern Discovery
- Position Histogram
