User talk:Ginhoven
LOADING DATA
In the this tutorial, you will learn how to:
- Create a New Project.
- Merge Data from several loaded Microarray Experiments.
- Rename a Project and/or Project Node.
- Remove a Project and/or Project Node.
- Load, Add, and/or Modify Remote Data.
Before you can continue, geworkbench should be running. For help with this, please refer to the Getting Started (insertlink) section. The file cardiomyopathy.exp should be used in this tutorial.
There are different types of files you can use when loading data
- Affy Excel or txt data file.
- Affymetrix File Matrix - this one will be used for the tutorial.
- RMA Express Processed File.
- Genepix Files.
- Genotypic data Files.
- Fasta Files
- Pattern Files
- Normalized no-confidence expression matrix
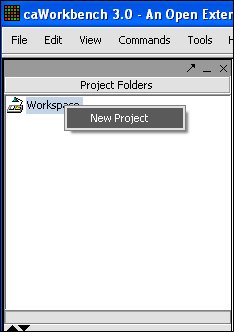
1. To create a New Project right mouse click on workspace.
2. Left mouse click on New Project.
'insert image here'
3. Project folder will open, right mouse click on Project folder, left mouse click on open files.
'insert image here'
4. Find the type of file that you want to work with.
5. Find the file(s) that you want to work with and select.
6. Make sure Local radial button is selected.
7. Click on the Open button.
'insert image here'
You Can Merge Data From Several Loaded Microarray Experiments Into One Project Folder
As long as files are of the same type you can merge them into a project folder. There are different Array files that you can use: You can do this during the original loading process, or after you have already loaded a file.
To Merge Data From The Original Loading Process
1. Right mouse click on the Project folder.
2. Select the files that you want to Merge.
3. Select the Merge Files box.
4. Left mouse click on the Open button.
'insert image here'
Your File Nodes will now be Merged into one Project folder.
To Merge Data From Experiments Already Loaded
1. Select the Project Nodes that you want to Merge.
2. Left click on file, choose Merge Datasets.
'insert image here'
You Can Rename a Project and/or a Project Node
Renaming A Project
1. Right mouse click on Project folder.
2. Select Rename.
'insert image here'
3. In Pop-up Screen Rename your Project.
4. Click on the Okay button
Renaming a Project Node
1. Right mouse click on Project Node.
2. Select Rename Project.
'insert image here'
3. In Pop-up Screen Rename your Project.
4. Click on the Okay button.
'insert image here'
NOTE:
You can also remove a Project or a Project Node by following the above steps and clicking on Remove.
Loading Remote Data
You can Load and Modify Remote Data.

