Local Data Files
|
Home | Quick Start | Basics | Menu Bar | Preferences | Component Configuration Manager | Workspace | Information Panel | Local Data Files | File Formats | caArray | Array Sets | Marker Sets | Microarray Dataset Viewers | Filtering | Normalization | Tutorial Data | geWorkbench-web Tutorials |
Analysis Framework | ANOVA | ARACNe | BLAST | Cellular Networks KnowledgeBase | CeRNA/Hermes Query | Classification (KNN, WV) | Color Mosaic | Consensus Clustering | Cytoscape | Cupid | DeMAND | Expression Value Distribution | Fold-Change | Gene Ontology Term Analysis | Gene Ontology Viewer | GenomeSpace | genSpace | Grid Services | GSEA | Hierarchical Clustering | IDEA | Jmol | K-Means Clustering | LINCS Query | Marker Annotations | MarkUs | Master Regulator Analysis | (MRA-FET Method) | (MRA-MARINa Method) | MatrixREDUCE | MINDy | Pattern Discovery | PCA | Promoter Analysis | Pudge | SAM | Sequence Retriever | SkyBase | SkyLine | SOM | SVM | T-Test | Viper Analysis | Volcano Plot |
Contents
Overview
This chapter covers:
- Data file formats supported by geWorkbench
- Loading microarray data from local files, while merging the data into one data set.
- Merging data from several previously loaded microarray experiments.
Open File Dialog
The Open File dialog can be reached in two ways:
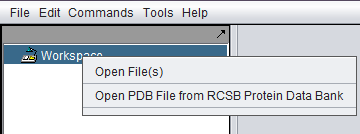
- Right-click on the Workspace node and select "Open File(s)".
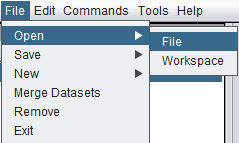
- From the top-level menu bar, select File->Open->File.
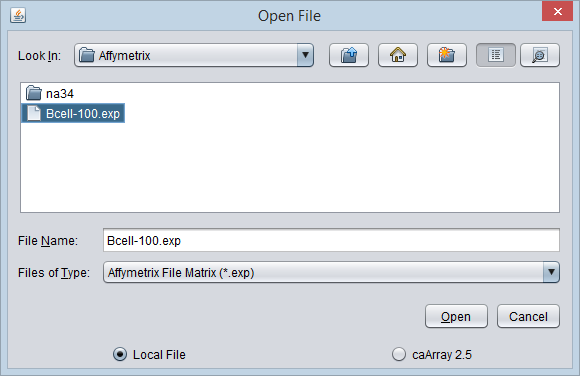
In either case, the File Open dialog will appear.
File Browser Controls
The file browser offers standard options
- Select Directory - A pulldown of directories available at the current directory level. The contents of the directory are listed below when a directory is selected.
- Up One Level - Move up one directory level.
- Desktop - Go to the user's desktop or home directory.
- Create New Folder - create a new directory in the current one.
- List - Display only the names of files and directories contained in the current directory.
- Details - Display name, size, type and date of items in the directory.
Other File Open Controls
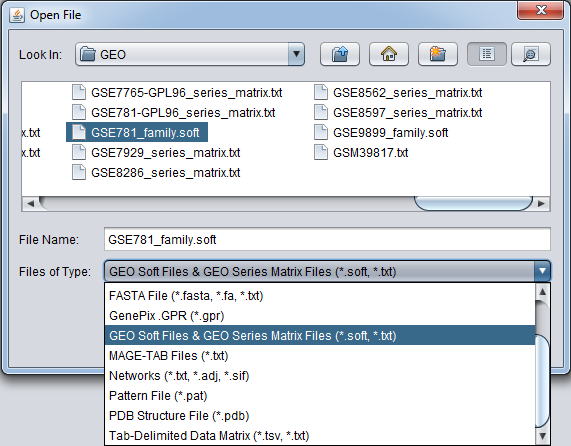
The selector lists the available file types that geWorkbench can load. Once a file type is chosen, only files matching the indicated file extension, e.g. (*.exp, *.fasta etc.) will be displayed in the available file list.
- File Name - the file name of the file selected is shown in this field.
- Files of Type - This pulldown menu lists all available file types that geWorkbench can read in. Available types are listed below. Each item is also followed by its file extension(s). Only files matching the appropriate extension will be displayed in the file list box.
- Open - Open the selected file.
- Cancel - Quit the File Open dialog without opening a file.
Merging Microarray Files
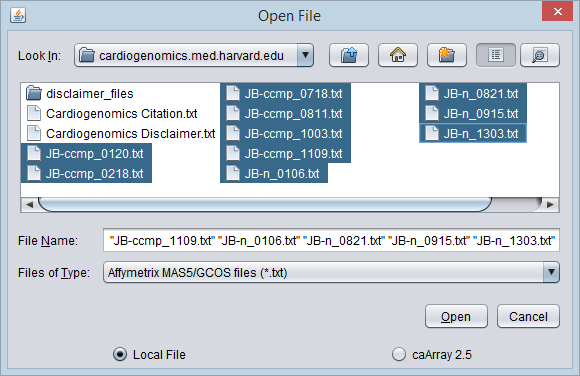
If multiple microarray gene expression files are read in at the same time, they will be merged into a single dataset. This can be done by multiple selecting the desired files in the file open dialog.
Background - When working with microarray data in geWorkbench, all data to be analyzed must be present within one data node. If the data exists as multiple files each containing results e.g. from single arrays, the data must be merged into a single node before it can be used. geWorkbench can perform this merging step either at the time data is read in, or later in a separate step. Once merged, such a dataset can be saved to disk; it will be saved in the geWorkbench matrix file format.
Requirements for merging microarray data files are:
- Markers - each file or dataset to be merged must contain exactly the same list of markers.
- Arrays - no array name can be repeated more than once.
If either condition above is not met, a warning pop-up will appear and the merge will be terminated.
Merging is not supported for other file types such as PDB, Fasta etc.
An example with individual MAS5 format files is illustrated below.
Local File vs Remote
These two radio buttons control whether the Open dialog is for local data or remote data. This chapter is concerned with opening local data files from disk. See the chapter Remote Data Sources for information on loading remote data from caArray.
Supported data formats
- Affy .CEL (*.cel) - Affymetrix CEL files (probe level data) can be viewed graphically in geWorkbench but not used directly for analysis.
- Affymetrix File Matrix (*.exp) - a geWorkbench spreadsheet-type multi-experiment format; this is the native file type created by geWorkbench from merged datasets. It can contain the data from any number of arrays in a spreadsheet-like "matrix" format. It also allows for the grouping of arrays into named subsets based on phenotypic criteria. Multiple such groups can be defined, each containing a different division of the arrays among named sets. geWorkbench can create files in this format from data read in in other formats.
- Affymetrix MAS5/GCOS (.txt) - produced by Affymetrix data analysis programs.
- FASTA (*.fasta, *.fa, *.txt) - DNA or amino-acid sequence files in FASTA format.
- Genepix (*.gpr) - Produced by a popular analysis program for two-color microarrays.
- GEO Soft and GEO Series formats (*.soft, *.txt)
- GSM (*.txt) - individual sample files.
- GSE (*.soft) - series files representing an entire experiment, e.g. GSE2189_family.soft.
- GDS (*.soft) - curated data matrix, e.g. GDS507_sample.soft.
- Series matrix (*.txt) - matrix format of submitted, uncurated data, e.g. GSE2189_series_matrix.txt.
- MAGE-TAB data matrix (*.txt) - this is an auxiliary MAGE-TAB data file type that can be used to contain summarized data from multiple arrays.
- Networks (*.txt, *.adj, *.sift) - network interaction files in adjacency (.adj) or Cytoscape (.sif) format. Files ending in .txt are also accepted in adjacency matrix format.
- PDB Structure File (*.pdb) - Molecular 3-D structure in Protein Data Bank format; can be viewed in the JMol Viewer in geWorkbench..
- Tab-Delimited Data Matrix(*.tsv, *.txt) (e.g. files exported by RMAExpress or other programs) - Microarray expression data in a simple columnar file format.
Detailed descriptions of expression file formats
See File Formats for detailed descriptions of some of the file formats used.
Microarray Data Annotation Files
If a microarray data file is being loaded, the dialog will give the user the option of also loading an annotation file. These files associate the individual markers, e.g. probesets, with information such as gene name, Entrez ID, GO Terms etc.
geWorkbench currently can utilize two types of Affymetrix annotation file:
- Affymetrix 3' Expression (CSV format)
- Affymetrix WT Gene/Exon ST, transcript level (CSV-format) - This parser supports both the Gene 1.0 ST and Gene 2.0 ST annotation files (same format).
Other platform types and manufacturers are not supported. See File Formats for further details on the actual file formats accepted. For some purposes, you can create files in the Affymetrix 3' Expression format for other platform types.
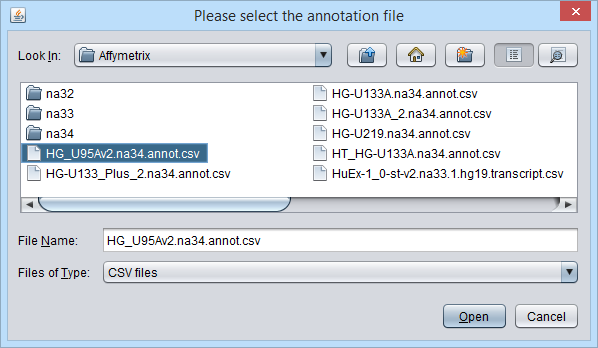
The file browser is used to locate an annotation file.
Next, you will be prompted to specify the type of annotation file type.
Here we select the 3' Expression format.
- Continue - accept the choice of annotation file/format.
- Cancel - If you hit "cancel" in either the initial annotation file selector dialog, or in the annotation file type selector dialog, the annotation file will not be read in.
Data Node Naming
When a file is read in, its file name, including any file type suffix, is given to the newly created data node.
The only exceptions to this are for files merged on read-in, and files downloaded from caArray (remote data source).
When multiple expression files are merged on read-in, the node name contains the name of each file merged.
However, when files are downloaded from caArray, the node name is always just the name of the experiment, not the individual files.
GEO Soft files
Multiple Platforms per GEO Soft file
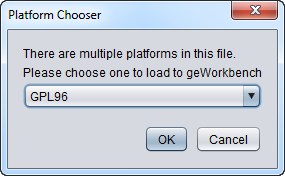
A GEO series file can contain samples from more than one platform (chip type). If geworkbench detects that there is more than one platform represented in the file, it will pop up a dialog box asking the user for which platform to load data. Data from only a single platform type can be loaded into any given microarray data node in geWorkbench.
multiple platform format example
The series file GSE6532_family.soft contains data obtained on three different Affymetrix platforms:
!Series_platform_id = GPL96 !Series_platform_id = GPL97 !Series_platform_id = GPL570
The data for individual samples is found in sections beginning with a SAMPLE tag, e.g.:
^SAMPLE = GSM65316
The platform used for the individual sample is given in the sample header by:
!Sample_platform_id = GPL96
geWorkbench will skip samples that are not from the selected platform.
Multiple data types in one Soft file
A GEO series file may contain not only individual sample results, but also a sample table summarizing the expression from all arrays. An example is GSE15139_family.soft. In such a case, where the file has been detected to be a series table (multiple individual sample entries), a sample table will be ignored. The individual sample entries may contain additional data beyond that available in the sample table (e.g. p-values, descriptive sample titles).
Array Names from GEO files
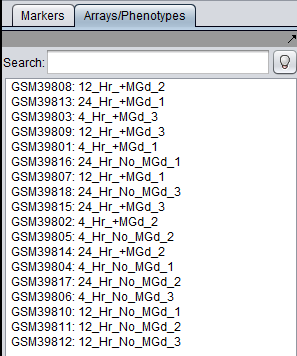
For most microarray dataset types, the array name will either be assigned in the file (e.g. Affy File Matrix) or will be taken from the name of the file (e.g. individual MAS5/GCOS files). However, for GEO Soft format series and series matrix files, we create array names by concatenating the GEO Sample identifier for the particular array with the corresponding sample title. For example, in the file GSE2189_family.soft, sample GSM39801 has the following title line:
!Sample_title = 4_Hr_+MGd_1
The array name in geWorkbench is then GSM39801:4_Hr_+MGd_1.
The below figure shows the sample titles appended to the GEO sample identifiers in the Arrays component (5th line):
GEO Platform Annotations Not Read
GEO Soft files can contain marker annotation entries. However, there is not a fixed format for all platforms, so geWorkbench does not attempt to parse this information.
GEO Comments skipped
GEO files can contain comment lines. The comments section is skipped by geWorkbench, and its format is not checked (as of release 2.3.0 of geWorkbench). This allows geWorkbench to read in files even if they have some formatting errors.
MAGE-TAB Data Matrix Files
Background on MAGE-TAB
MAGE-TAB is a simple but structured method to describe and report microarray data.
Two text files are used to describe the experiment and the individual microarrays.
The Investigation Description Format (IDF) is a tab delimited file containing information about the experiment as a whole, including investigator, experiment description, and protocols used.
The Sample and Data Relationship Format (SDRF) is used to relate particular samples and treatments to particular arrays and resulting data files, which may be in native or processed formats.
Further details on all the file types can be found in the MAGE-TAB paper.
In addition, an optional, tab-delimited format data matrix file can contain summary expression data from all of the arrays in the experiment.
The main feature of this data matrix format is that, for each column, the first line contains array identifiers (as found in the SDRF file), and the second line contains quantitation types, such as "signal" or "p-value".
An example is shown here:
http://www.biomedcentral.com/1471-2105/7/489/table/T10
The MAGE-TAB Data Matrix Parser in geWorkbench
To open a file of this type from disk, the user selects the "MAGE-TAB Files" option in the Open File dialog.
If there is a single column per microarray, that column is assumed to be the signal column and the data is loaded.
As described above, more than one column can be present per array, representing different quantitation types, e.g. 'SIGNAL', 'PAIRS', 'DETECTION'.
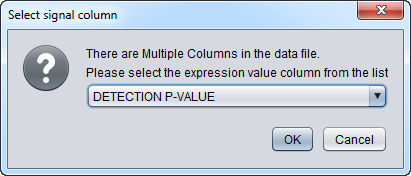
If the data file has multiple columns for each array, the user is prompted to select which column represents the expression signal.
In addition, for Affymetrix MAGE-TAB files representing Affymetrix data, Detection p-values are automatically parsed if present, i.e., Column names with 'DETECTION P-VALUE', 'AFFYMETRIX_Detection P-value'.
This figure shows the initial pop-up dialog to choose the signal column:
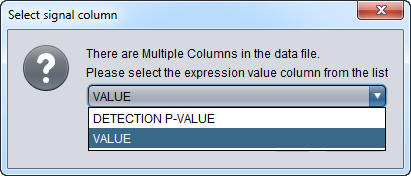
Choosing the "VALUE" column:
Network Interaction Files
Overview
geWorkbench can read in files that represent a network of interactions between molecules. Some typical interaction types are protein-dna, protein-protein, TF-modulator, and miRNA-mRNA. The genes, proteins or molecules are referred to as nodes in a network graph, and the interactions as edges.
geWorkbench can currently read in the two types of network files:
- adjacency matrix - the format generated by ARACNe and the CNKB component.
- SIF - A simple format which includes the interaction type, e.g. protein-dna (pd).
The network file formats are described in the File Formats chapter. The adjacency matrix includes a numeric value for each edge, which can be used to represent e.g. some measure of strength for the interaction or the confidence that it is real. The SIF format includes an interaction type for each edge.
A network file must be loaded as the child of a microarray dataset. This allows a mapping of network nodes to microarray dataset markers (probesets). A marker set defined in the Markers component can be projected onto a network displayed in Cytoscape, and a selection of nodes in Cytoscape is returned automatically to the Markers component. Many other operations are available.
Adjacency matrices are loaded by first selecting the Workspace node, and then using either the menu-bar or right-click File->Open dialog. A microarray dataset chooser allows the user to select to which dataset to add the network.
Representation of networks in geWorbench
A network, when read in, is represented in geWorkbench at the level found in the input file. That is, gene-level networks will be represented at the gene level, and marker (probeset)-level networks will be represented at the probeset level. Markers mapping to a given gene (as given in the array annotation file, if loaded) will be determined on demand for use in particular components, e.g. Cytoscape or MRA.
Loading a Network File
Prerequisites
- A microarray dataset compatible with the network must be loaded first.
Network File Details
- The network can be represented in terms of markers (probesets), gene symbols, Entrez IDs, or some other string. Only one convention should be used within one file.
- For geWorkbench 2.3.0 and above, networks can only be represented as tab-delimited files. Previously, spaces were allowed.
- If marker names are used, they should match the marker names used in the microarray dataset to allow mapping between the two.
- Similarly, if gene symbols or Entrez IDs are used, mapping between the network and microarray dataset will be provided if an appropriate annotation file was loaded with the microarray dataset.
Example
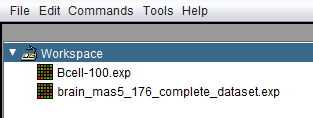
Two microarray datasets have already been loaded.
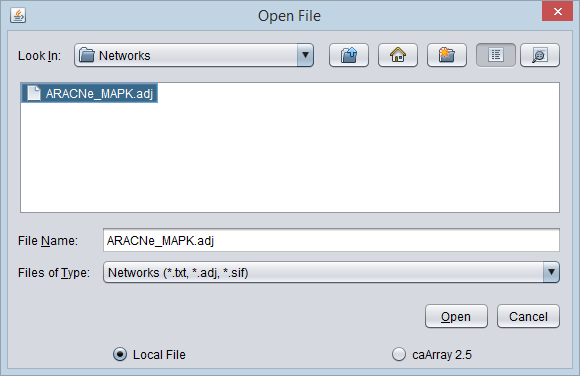
- Select the Workspace node and then right-click. Select "Open Files". The Open File dialog will appear.
- Select the file type "Networks". (Files with a suffix ".txt", ".adj", and ".sif" are shown).
- Browse to and select the desired network file, and click "Open".
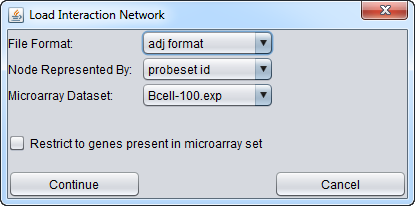
- After the network has been chosen, a second dialog will appear. In this dialog, you will choose
- File Format (ADJ or SIF). The ADJ or SIF format will be preselected if the file ends with one of those extensions.
- Node represented by (identifier type). Choices are
- probeset id
- gene name (i.e. the gene symbol)
- Entrez ID
- other
- Microarray dataset
- choose the microarray dataset to which this network will be attached. This will allow direct, two-way mapping of probesets/genes between the dataset and the network.
The figure above shows one of two available microarray datasets being chosen. Here we use the Bcell-100 dataset.
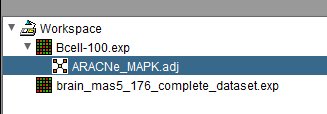
The network is shown below loaded as a child of the chosen dataset in the Workspace.
Network Size Limitation for Viewing
If the Cytoscape component has been loaded (see the CCM), the network will appear there. However, be aware that there are limits as to how large a network can be loaded into Cytoscape.
Pattern Files
In the Pattern Discovery component, individual or multiple patterns can be saved to a text file. This file also contains the name of the sequence file from which they were generated (parent data set).
Before loading a pattern file, the matching sequence file must already be present in the Workspace.
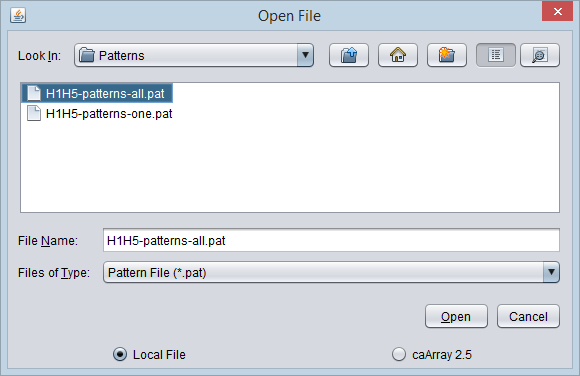
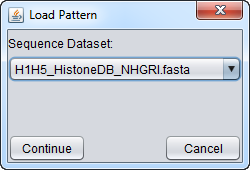
In the "File Open" dialog, Pattern Files (*.pat) can be opened and reassociated with their parent sequence file. As with loading network files, when loading a pattern file, the user will be prompted to select a parent data node.
If the selected parent sequence node does not match the name stored in the pattern file when the patterns were created, a warning dialog will appear and the pattern will not be loaded.
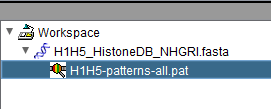
The following steps show how to add a saved pattern file to this sequence node.
1. From the File Open dialog, select file type "Pattern".
2. Browse to the desired pattern file and push "Open".
3. A second dialog will appear, in which one can select the correct parent sequence node. The pattern file will be added as a child of this node.
4. After selecting the desired parent node, hit "Continue".
The pattern file will be added as a child of the selected parent node.
Note - If the selected parent sequence node does not match the name stored in the pattern file when the patterns were created, a warning dialog will appear and the pattern will not be loaded.
FASTA files
FASTA format files must contain an identifier line followed by one or more lines of sequence, either amino-acid or nucleotide. The first line must begin with a ">" character. If it does not, geWorkbench will pop-up a warning box and not load the file. The identifier is required to refer to the sequence within geWorkbench.
An example of a valid FASTA format file is:
>1e09
GVFTYESEFTSEIPPPRLFKAFVLDADNLVPKIAPQAIKHSEILEGDGGPGTIKKITFGEGSQYGYVKHK
IDSIDKENYSYSYTLIEGDALGDTLEKISYETKLVASPSGGSIIKSTSHYHTKGNVEIKEEHVKAGKEK
ASNLFKLIETYLKGHPDAYN
Example: Loading microarray data files - local
In this example, we will load 10 individual Affymetrix MAS5 format files, and merge them into a single dataset. The origin of these file is described in the section Tutorial Data.
Note that no Affymetrix annotation files are included in the geWorkbench distribution. The annotation file for the HG-U95Av2 array used in this example can be obtained from the Affymetrix website. See the instructions in the FAQ entry on this topic.
1. Right-click on the Workspace node and select Open Files.
A file browser will appear with which you can select the files you wish to open. The default is to browse for local files, that is on your own computer. geWorkbench can also access data from caArray databases (the Remote option).
3. Here, we select the file type Affymetrix GCOS/MAS5 as shown.
4. We will select 10 MAS5 format text files from the directory data/cardiogenomics.med.harvard.edu, which is included within the geWorkbench installation.
5. Click Open.
Microarray gene expression files opened at the same time are automatically merged into a single dataset (as of geWorkbench 2.3.0).
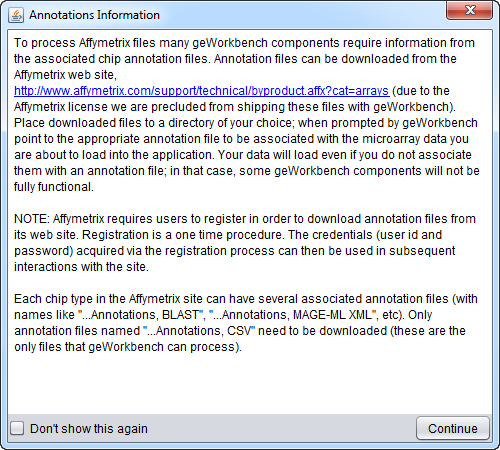
6. A message will appear giving information about associating an annotation file with the dataset.
7. A file browser will then open with which you can, if you wish, select an annotation file matching your dataset. This is needed if you intend to use features of geWorkbench such as the Sequence Retriever or GO Terms component (Gene Ontology).
8. Choose the type of annotation file being used:
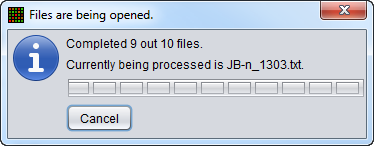
A status bar will display as the data is loaded:
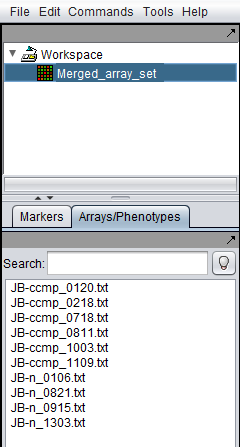
9. The merged data set is listed in the Workspace. The individual arrays are shown below in the Arrays component.
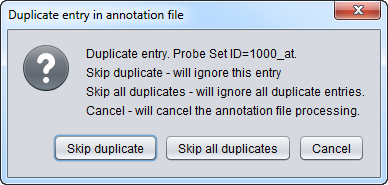
Note - if you have created a custom Affymetrix-format annotation file which has more than one entry for a probeset, an error dialog will be shown.
See File_Formats#Affymetrix_Annotation_Files for further details.
