Pattern Discovery
|
Home | Quick Start | Basics | Menu Bar | Preferences | Component Configuration Manager | Workspace | Information Panel | Local Data Files | File Formats | caArray | Array Sets | Marker Sets | Microarray Dataset Viewers | Filtering | Normalization | Tutorial Data | geWorkbench-web Tutorials |
Analysis Framework | ANOVA | ARACNe | BLAST | Cellular Networks KnowledgeBase | CeRNA/Hermes Query | Classification (KNN, WV) | Color Mosaic | Consensus Clustering | Cytoscape | Cupid | DeMAND | Expression Value Distribution | Fold-Change | Gene Ontology Term Analysis | Gene Ontology Viewer | GenomeSpace | genSpace | Grid Services | GSEA | Hierarchical Clustering | IDEA | Jmol | K-Means Clustering | LINCS Query | Marker Annotations | MarkUs | Master Regulator Analysis | (MRA-FET Method) | (MRA-MARINa Method) | MatrixREDUCE | MINDy | Pattern Discovery | PCA | Promoter Analysis | Pudge | SAM | Sequence Retriever | SkyBase | SkyLine | SOM | SVM | T-Test | Viper Analysis | Volcano Plot |
Contents
Outline
In this tutorial, running a pattern discovery algorithm on a set of protein sequences is described. The steps include:
- Setting parameters
- Creating a new session
- Running the job
- Viewing the results
Overview
The geWorkbench Pattern Discovery module uses an algorithm called SPLASH (Califano, 2000) to search for common patterns in sets of protein or DNA sequences. This type of search could be used, for example, to search for common structural or regulatory elements in otherwise unrelated sequences.
(Note - there currently is no provision for filtering out repeated sequences from genomic seqeuence. Results on DNA sequences should be evaluated in this light).
Component layout
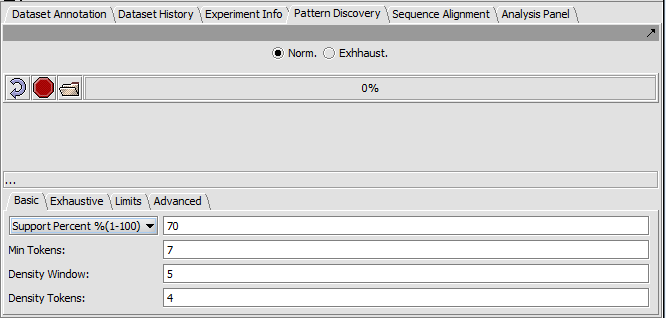
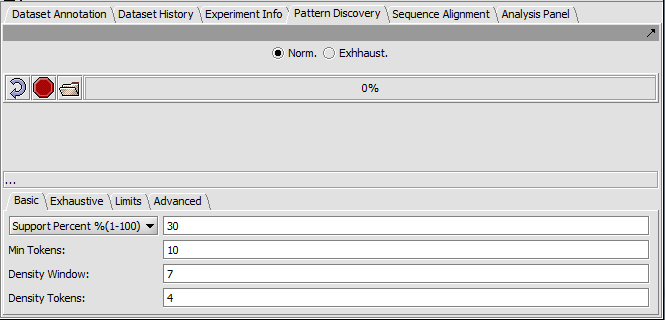
The Pattern discovery component control area has three sections.
- Run controls are shown at top,
- the hit display area is in the center (empty in the figure below), and
- the parameter settings are at bottom.
Top-level run controls
- Norm - select the "normal" pattern discovery algorithm.
- Exhaustive - select the "exhaustive" pattern discovery algorithm. This takes much more time.
- Curling arrow - start a new pattern discovery run.
- Stop sign - Cancel the current pattern discovery run
- File folder - load a pattern file
- Progress bar - To the right of the control buttons is a progress bar that reports on the current stage of discovery being executed.
Setting parameters
A number of parameters can be adjusted by the user to adjust the sensitivity of the search.
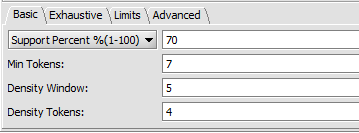
Basic tab
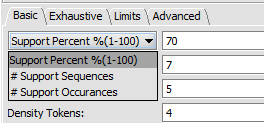
Three options for specifying support are available via a pulldown menu:
- Support Percent % - The pattern must appear in at least given percentage of sequences.
- # Support Sequences - The pattern must appear in at least the given number of sequences.
- # Support Occurrences - The pattern must occur at least the given number of times in the set of sequences (can be more than once per sequence).
- Min Tokens - The minimum number of characters in a discovered motif.
- Density Window - A sliding window in which at least the number of tokens set in "Density Tokens" must be found.
- Density Tokens - the minimum number of matching characters within the "Density Window".
Exhaustive tab
Parameters specific to the "exhaustive" search algorithm can be set in this tab.
- Dec. support (%) - sets the size of intervals by which support level is decremented in successive searches (default is 5)
- Dec. density support - not used.
- Min support - sets the lower limit on the percentage of sequences that must contain a specific motif (default is 10%).
- Min pattern number - sets a lower limit on the number of motifs in a cluster.
Limits
- Max Pattern Number - limits the number of patterns to discover.
- Max run time (sec) - limits search time.
Advanced tab
- Exact Only (default checked)- When checked, no substitution matrix will be used. Exact exact character matches are required. "Exact only" should always be used for DNA as no DNA substition matrix is provided.
- Count Sequences (default not checked, but see following) - intended to allow additional sorting options. Will be automatically checked (selected) if the support option "Support percentage" or "# Support Sequences" is chosen in the basic parameters tab.
- Similarity matrix choice (default BLOSUM50) - Other choices are BLOSUM62 and BLOSUM100.
- Similarity threshold -
Run Pattern Discovery
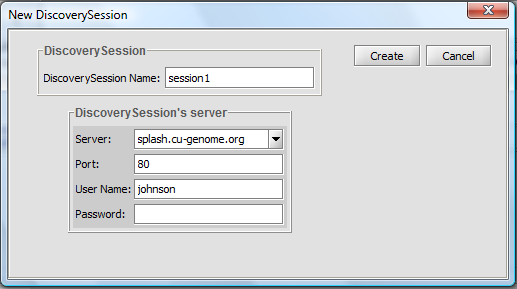
- Pushing on the button with the curling arrow icon will bring up the session creation box:
Discovery Session
- Discovery Session Name: A name is auto-generated for identifying the job on the server, but any name can be entered.
- Create - Push to start the search.
- Cancel- Cancel the discovery run.
Discovery Session Server
- Server and Port: Columbia supports a Pattern Discovery server at splash.cu-genome.org, Port 80.
- Username: Any name can be entered to identify the job.
- Password: none currently required.
The progress bar will show the several stages of a search:
- Uploading
- Processing seeds
- Discovering
- Collating
- Done
Viewing results
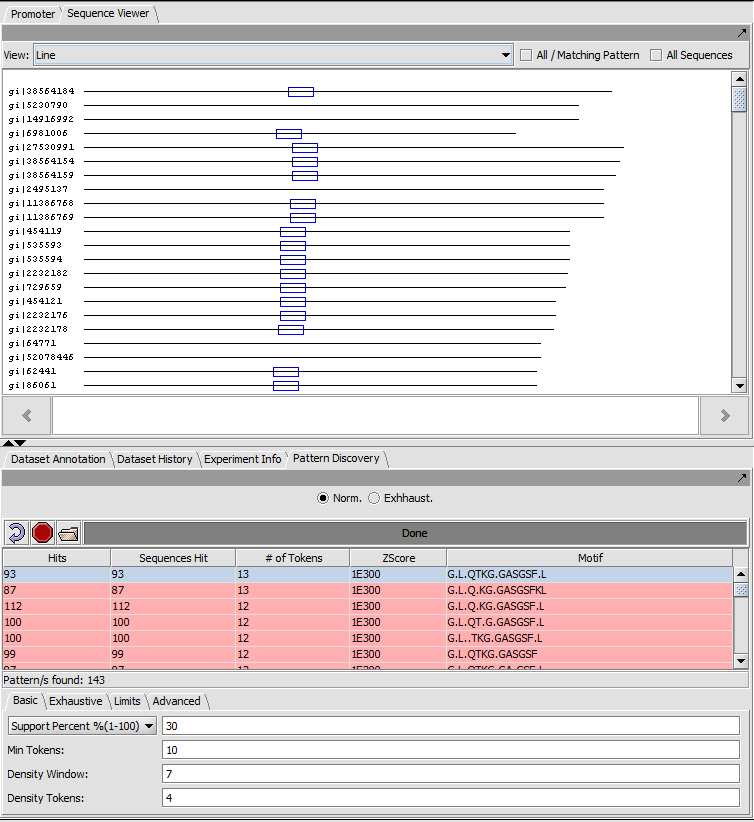
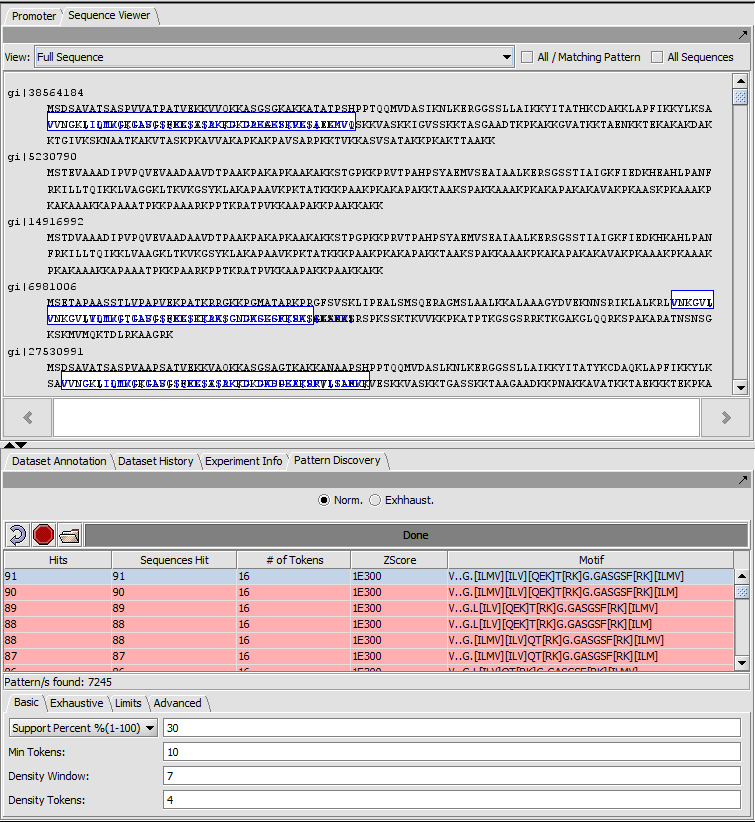
The result of the search can be viewed both in the Pattern Discovery module itself and in sequence viewer modules such as "Sequence" and "Promoter" and "Position Histogram". In Pattern Discovery the results are returned in a table, and the hits for the motif(s) selected in the table will be displayed superimposed on the sequences displayed e.g. in the Sequence Viewer located above in the Visual area. In this picture, the results were first sorted by the number of tokens.
Result (Exact matches) sequence line view
Each sequence is shown as a line with length proportional to the sequence length. All sequences are left-aligned.
The position of matches along the sequence are shown using colored boxes (here blue).
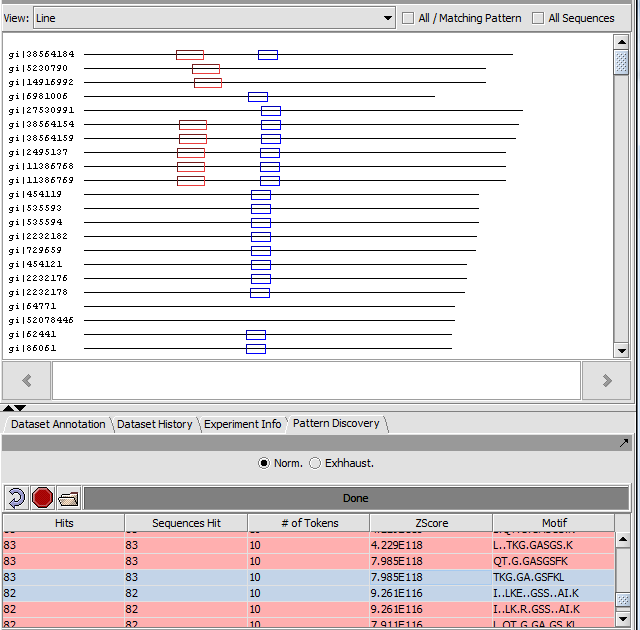
If more than one pattern is selected, each will be displayed using a separate color:
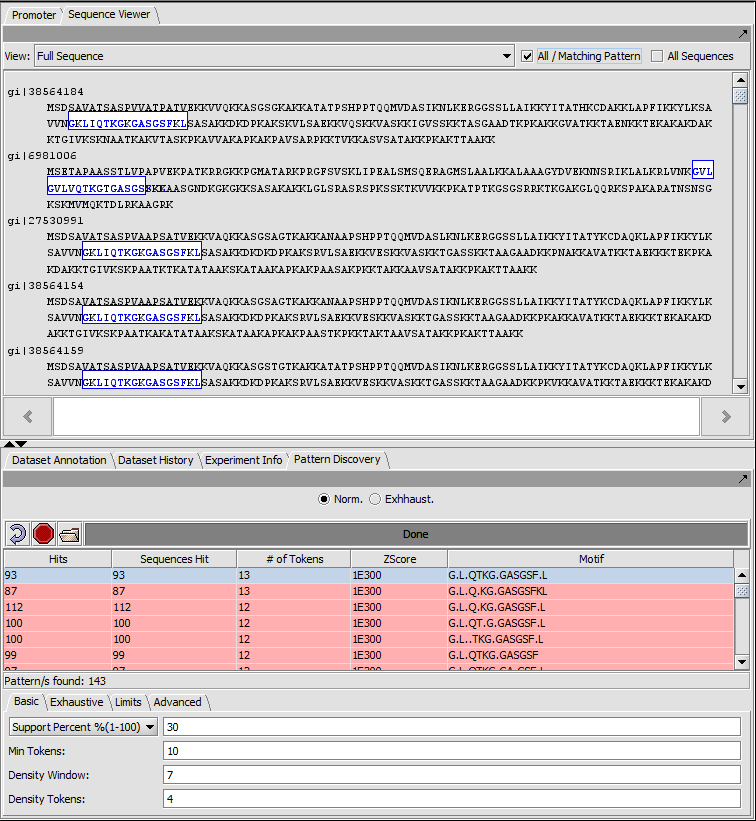
Result (Exact matches) full sequence view
In full sequence view, the actual sequence letters are displayed and matches are again outlined in colored boxes (here blue).
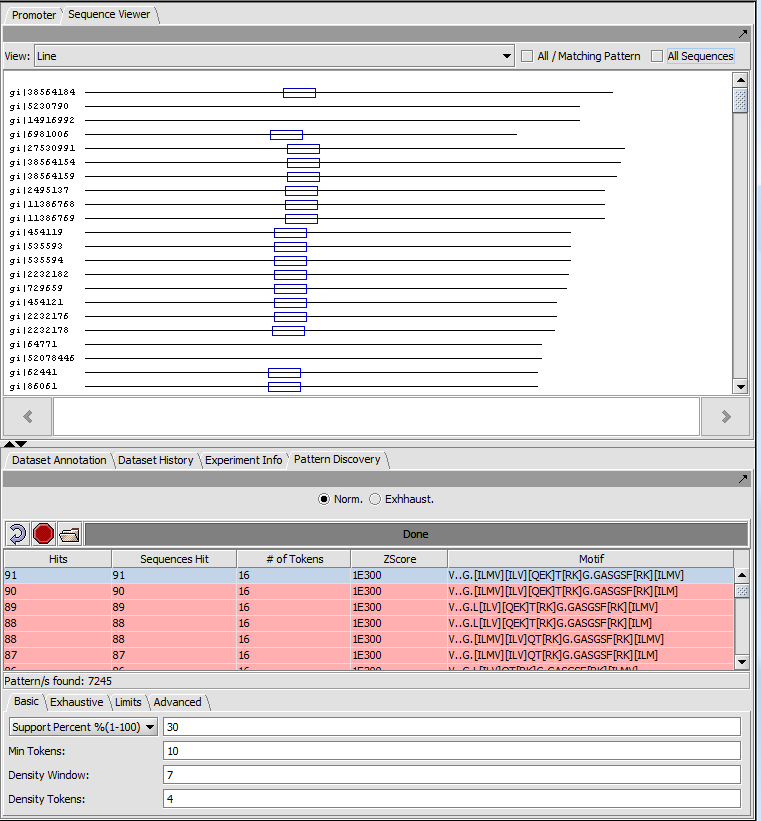
Result (BLOSUM50) in sequence line view
Result (BLOSUM50) full sequence view
Position Histogram
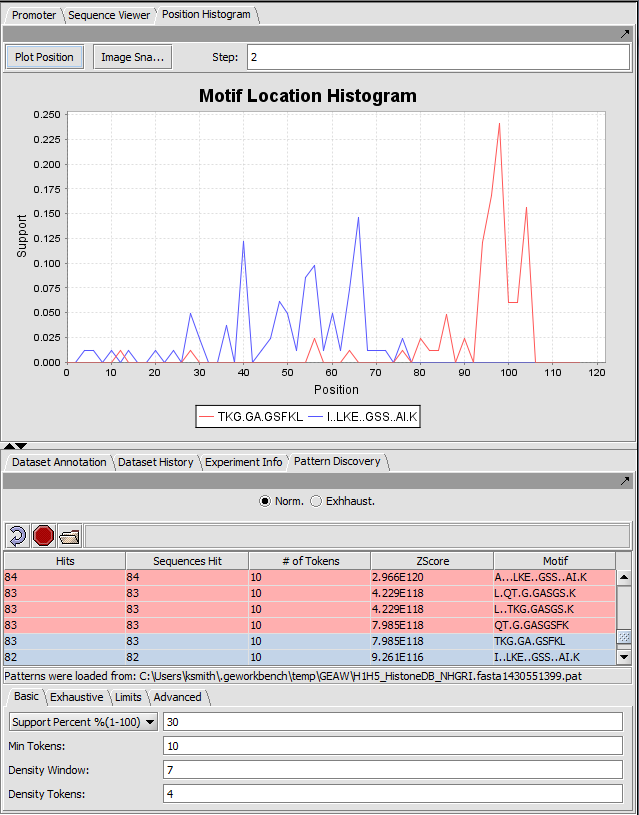
The Position Histogram displays (binned) support of each motif along the length of the sequences.
- Support - The number of times a motif is found among all the sequences at a particular position or within a particular range of positions (bin step size) is counted. The result is displayed as fractional support for the motif at that position.
- Step - the sequences are divided into bins of the specified "step" size.
- Plot Position - push to draw a new histogram.
- Image snapshot - place a copy of the histogram as an image into the Project Folders component.
Note that this will only be useful to the extent that the sequences are in some way aligned before analysis.
The figure below show the same two motifs selected as in the previous diagram. Each is displayed in a unique color.
Note that in this example, the sequences are NOT aligned.
Adding results to the Projects Folder
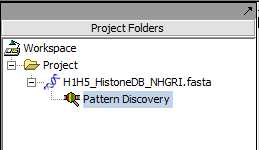
The results of a run of Pattern Discovery are automatically placed in the Project Folder:
Options to Save or Mask Patterns
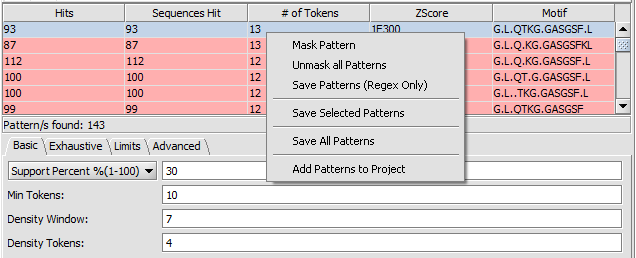
Several operations are possible on the returned patterns. The options menu can be seen by right-clicking on a selection of one or more returned patterns.
1. The patterns can be saved, either with their positions on the original sequences, or just as regular expressions.
2. The patterns can be masked out of the query sequence.
The options shown in the picture below are:
- Mask Pattern - The selected pattern(s) will be masked out of the sequence for future searches.
- Unmask All Patterns - Undo the masking.
- Save Patterns (Regex Only) - This will save the selected pattern(s) in the form of regular expressions, that is, letters and wild-card characters.
- Save Selected Patterns - This will save both the selected pattern(s) and their hits to the query sequences. The locations (positions on the query sequences) saved are specific to the particular input file used. The name of this file is saved in the pattern file.
- Save All Patterns - This will save both all of the patterns and their hits to the query sequences. The locations positions on the query sequences) saved are specific to the particular input file used. The name of this file is saved in the pattern file.
- Add Patterns to Project - This will add the patterns found as a data node in the Projects Folder, with the position information on the input sequences.
Notes on display of results
- Pattern Discovery results can only be displayed in the context of the sequences from which they were derived.
Example Pattern Discovery runs
Prerequisites
- Make sure that Pattern Discovery and Position Histogram (if desired) are loaded in the Component Configuration Manager.
- Load a file containing the sequence or sequences to be analyzed into the Project Folders component.
For this example, we use a file containing a number of histone sequences, H1H5_HistoneDB_NHGRI.fasta.
The Pattern Discovery component appears in the Command area of geWorkbench (lower right quadrant) when a sequence data node is selected.
Setup (Exact matches)
We will try parameters set to allow longer matches. No changes from default are made in the other parameter tabs. In particular, this search uses exact matching of the sequence letters, without substitutions.
- Support Percent: 30
- Min tokens: 10
- Density Window: 7
- Density tokens: 4
These parameters were empirically chosen. You can try variations to see how it affects the result.
The results are pictured above in Viewing Results.
Setup (BLOSUM50)
If the "Exact only" checkbox in the Advanced Parameters tab is unchecked, a selected BLOSUM substitution matrix for protein sequences will be used.
The results of repeating the same run as before but using BLOSUM50 are pictured above in Viewing Results.
References
Califano, A. (2000). SPLASH: structural pattern localization analysis by sequential histograms. Bioinformatics, Apr;16(4):341-57 (link to paper).
