Sequence Retriever
|
Home | Quick Start | Basics | Menu Bar | Preferences | Component Configuration Manager | Workspace | Information Panel | Local Data Files | File Formats | caArray | Array Sets | Marker Sets | Microarray Dataset Viewers | Filtering | Normalization | Tutorial Data | geWorkbench-web Tutorials |
Analysis Framework | ANOVA | ARACNe | BLAST | Cellular Networks KnowledgeBase | CeRNA/Hermes Query | Classification (KNN, WV) | Color Mosaic | Consensus Clustering | Cytoscape | Cupid | DeMAND | Expression Value Distribution | Fold-Change | Gene Ontology Term Analysis | Gene Ontology Viewer | GenomeSpace | genSpace | Grid Services | GSEA | Hierarchical Clustering | IDEA | Jmol | K-Means Clustering | LINCS Query | Marker Annotations | MarkUs | Master Regulator Analysis | (MRA-FET Method) | (MRA-MARINa Method) | MatrixREDUCE | MINDy | Pattern Discovery | PCA | Promoter Analysis | Pudge | SAM | Sequence Retriever | SkyBase | SkyLine | SOM | SVM | T-Test | Viper Analysis | Volcano Plot |
Contents
Overview
The Sequence Retriever component fetches the DNA or protein sequences for selected gene markers from remote databases. Nucleotide sequences are retrieved from the GoldenPath database hosted at the UC Santa Cruz. Amino-acid sequences are retrieved from the European Bioinformatics Institute (EBI).
As of geWorkbench release 2.2.1, DNA sequences are retrieved using the transcription start site obtained for the desired gene from the refGenes table at UCSC. This table lists refSeq genes available for each supported species. Previously, geWorkbench used the KnownGenes table, which supported only human, mouse and rat.
The Sequence Retriever component functions only in the context of microarray datasets. The component also depends on the microarray platform annotation file, which must be loaded when the microarray dataset is read into geWorkbench.
One the desired sequences have been downloaded, they can be viewed or saved to the Project Folders component for use by other components. Examples include running BLAST searches, looking for the presence of known promoter motifs ( Promoter Analysis), or looking for patterns in a set of sequences using Pattern Discovery.
Controls
- Type - DNA or Protein
- Source - The pulldown menu to the right of the "Type" pulldown shows the source to query for the data. At present, only one choice for each type is supported. DNA sequences are retrieved from the UCSC Santa Cruz. Protein sequences are retrieve from the EBI.
- Marker - This panel shows markers that are in any activated set in the Markers component.
- Find a Marker - This tab allows one to search in the component for a particular marker. However, we recommend performing searches in the Markers component and adding the results to a set.
- "- and +" text fields - For DNA sequence retrieval, these two text fields specify the distance upstream (-) and downstream (+) from the transcription start site for the request. They are disabled when a protein query is selected. The default setting is 2000 bp upstream and 1000 bp downstream.
- Stop - Stop the current sequence download. Only available while a download is in progress.
- Clear - clear the query results display.
- Get Sequence - Launches the query using the selected markers.
- Add to Project - Add selected sequences returned by the query to the Project Folders component.
- View - Line or Full Sequence.
- Include - Check boxes for sequences to copy to the Project Folders component when "Add to Project" is pushed.
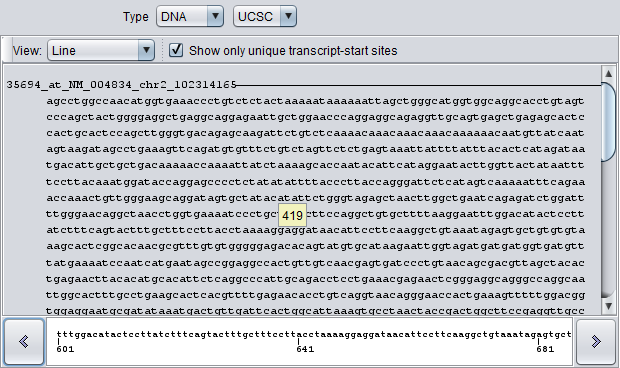
- Name - The name for a sequence is formed by concatenating the marker name with the chromosome number of physical location of the sequence on the chromosome, e.g. in 35694_at_chr2_102314487, "35694_at" is the probeset id, and the sequence is located on chromosome 2 at position 102314487.
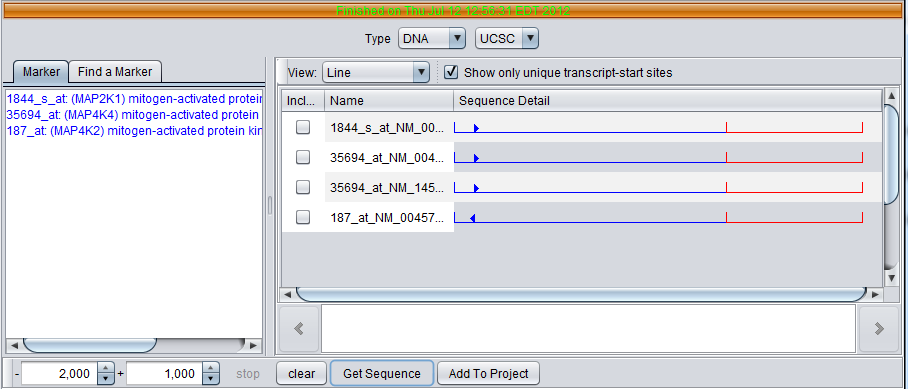
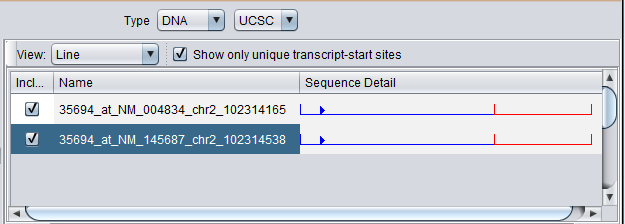
- Sequence Detail - graphically depicts the upstream (blue)and downstream (red) sequences areas, and the transcription start site and direction of transcription (blue arrow).
- Detailed sequence display box - At the bottom of the component, clicking on a sequence in the display above will show the letters with a position scale.
Using the Sequence Retriever
The Sequence Retriever displays a list of the contents of any marker set or sets that are "activated" in the Markers component. "Activated" means that the check-box next to the set's name in the Markers component is checked. These are the markers that will be used in a query to a remote data source.
The Markers component provides a dynamic search feature with which the user can locate desired markers and add them to a set.
DNA or protein sequences can be requested.
For DNA sequences, the Sequence Retriever retrieves genomic sequence from the Golden Path database at the UC Santa Cruz. The amount of sequence upstream and downstream to fetch can be specified in the range settings (-+).
Once sequences have been retrieved, some or all can be added to the Project Folders component as a new data node (Add to Project button).
Prerequisites
- A microarray dataset must be loaded.
- An annotation file must be associated with the microarray dataset at the time it is loaded. At present, only Affymetrix-format annotation files can be read in. These files can be obtained for Affymetrix chip types from affymetrix.com. For exact instructions, please see the geWorkbench FAQ page: FAQ
- A set in the Markers component containing one or more markers of interest must be activated.
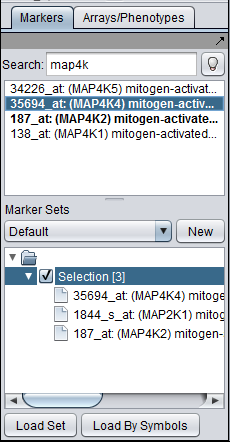
Here we show searching for MAP4K4 in the Markers component and adding it to the default "Selection" set. When this set is activated, the marker will appear in the Sequence Retriever component.
Retrieving Sequences
- Type - Select DNA or Protein sequences
- Range - If downloading genomic DNA, check/set the range upstream and downstream of the transcription start site for which to retrieve sequence.
- The default range is from -2000 (upstream) +1000 (downstream) relative to the start of transcription.
- Hit Get Sequence.
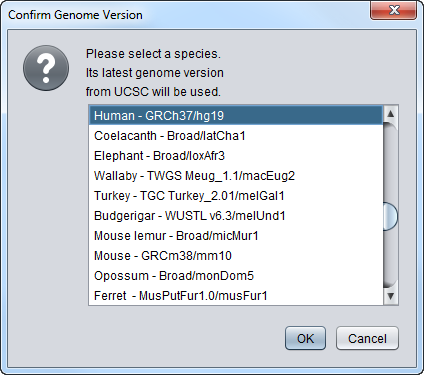
- Select Genome version - If the query is for DNA, the user is prompted to select for the species and version of the genome build to query. You should choose the species corresponding to the microarray chip of the dataset you have loaded. The list of available genome builds is obtained automatically from Santa Cruz.
The retrieved sequences are depicted in the viewer area on the right-hand side of the component. All sequences associated with a given gene symbol are retrieved.
DNA Sequences
For the MAP4K4 marker, three genomic sequence were retrieved.
DNA Sequence Naming - Each retrieved sequence is given a name formed by concatenating the probeset name for the marker, the refSeq identifier, the chromosome, and the location on the chromosome of the transcription start site obtained from the UCSC refGene table.
Protein Sequences
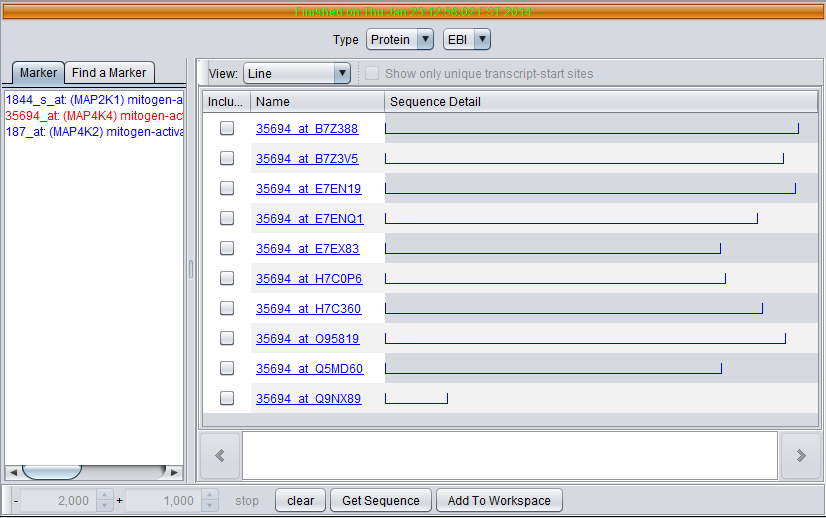
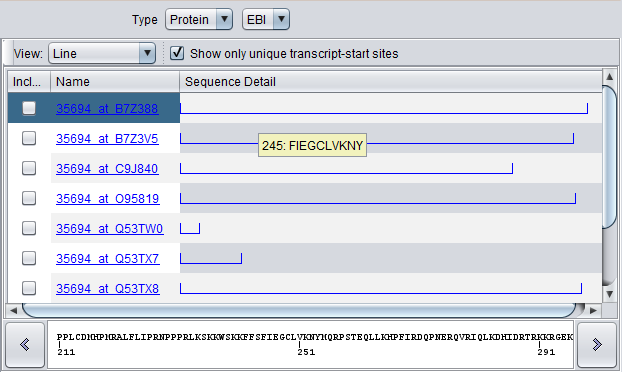
For the MAP4K4 marker, six sequences were returned. Note the differences in length as shown graphically.
Protein Sequence Naming - For protein results, the sequence name is formed by concatenating the probeset id with the UniProt ID of the sequence.
Viewing Sequences
The graphic sequence viewer pane of the Sequence Retriever component has two viewing modes - "Line" and "Full Sequence", controlled by the "View" pulldown menu.
Line View
When the view mode is set to "Line", each sequence is represented by a line in the graphic.
Line details for DNA Sequences:
- Blue - for sequence upstream of transcription start site, the line is blue.
- Red - for sequence downstream from transcription start site, the line is red.
- Blue arrowhead - marks the position of the transcription start site and the direction of transcription.
- right-arrowhead - plus strand transcription
- left-arrowhead - minus strand transcription.
The line mode has several actions:
- Click - Clicking at any position along a sequence line view causes the local sequence at that position to be displayed in the field at the bottom of the viewer.
- Hover - Placing the mouse cursor over the sequence line view will cause a hover text to appear with the position number and the next 10 sequence letters starting at that position.
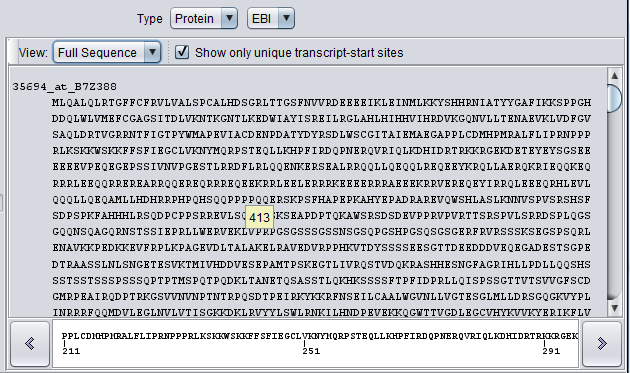
- Double-click to Full View - Double-clicking with the mouse on a particular line will cause just that line's full sequence to be displayed in the viewing window.
Double-clicking again in this view will return the display to the line view.
Line view for protein sequences:
For protein sequences, the entire line is blue. Hover and click actions are the same as described for DNA sequences.
Full Sequence View
When the view mode is set to "Full Sequence", the entire sequence for each marker is displayed.
Saving Sequences to the Project
To the left of each retrieved sequence is a check-box, in the column titled "Include". To save sequences to the Project Folders component, select those desired by checking the adjacent boxes, and then press "Save to Project".
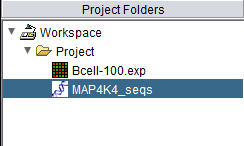
All sequences saved at one time will appear in a single new node in the Project Folders component. You will be prompted to enter a name for the new data sequence node. Here we have given the node the name "MAP4K4_seqs".
Note that when this node is selected, the Viewing area of the geWorkbench GUI will now show components that support working with sequences. However, the Sequence Retrieval component will no longer be visible! You must select the Project or the sequence's parent object to see the Sequence Retrieval component again.
Saving sequences to an external FASTA file
Once a group of sequences has been saved to the Project Folders component, they can also be saved to a file on disk.
- Right-click on the sequence node in the Project Folders component.
- Select Save.
- Enter a suitable name and save the file.
