Difference between revisions of "Workspace"
(→Details of the geWorkbench Affymetrix File Matrix) |
(→Details of the geWorkbench Affymetrix File Matrix) |
||
| Line 42: | Line 42: | ||
#The first line begins with the word "AffyID", then the word "Annotation" in the second column. Columns 3 and on contain the array names. | #The first line begins with the word "AffyID", then the word "Annotation" in the second column. Columns 3 and on contain the array names. | ||
#There can be any number of phenotypic groups on the following lines, each beginning with the word "Description", followed by the name of the group in the second column. Columns three on contain the particular set label for each array. | #There can be any number of phenotypic groups on the following lines, each beginning with the word "Description", followed by the name of the group in the second column. Columns three on contain the particular set label for each array. | ||
| − | + | # After the Description lines, if any, the remaining lines contain the data matrix. The first column contains the marker name (Affy ID). The second column can contain annotation information. However, annotations can also be read in from a separate annotation file (Affymetrix CSV format). The remaining columns contain, as explained above, the signal and confidence values for each array. | |
| − | After the Description lines, if any, the remaining lines contain the data matrix. The first column contains the marker name (Affy ID). The second column can contain annotation information. The remaining columns contain, as explained above, the signal and confidence values for each array. | ||
Revision as of 17:40, 24 February 2010
Contents
Outline
In this tutorial, you will learn how to:
- Create a new Project.
- Rename a project and/or project node.
- Remove a project and/or project node.
- Save project files that you have created.
Workspaces and Projects
In the Project Folders component there is a top-level object called a workspace. The workspace can contain one or more separate projects, and each project can contain opened data files and analysis results. An analogy might be that a workspace is like a drawer in a filing cabinet, and projects are individual folders in that drawer. Projects allow data to be grouped, for example by experiment. A project can contain many different types of data, for example microarray data, FASTA sequence files and graphical images. The workspace as a whole, with all its projects and data nodes, can be saved and restored. However, only one workspace can be open at one time.
Supported data formats
- Microarray
- Affymetrix MAS5/GCOS files - produced by the Affymetrix data analysis programs.
- Affymetrix File Matrix - a spreadsheet-type multi-experiment format; this is the native file type created by geWorkbench from merged datasets. There are two data columns per array; the first contains the signal value, the second contains either a p-value or an Affymetrix Present/Missing/Absent call. The header format for this file is complex.
- Tab-delimited text (RMAExpress file or GEO series matrix) - A simple columnar file format. geWorkbench can read files in this format produced by RMAExpress and in the GEO series matrix format. They differ slightly in the headers.
- Genepix .GPR files - Produced by a popular analysis program for two-color microarrays.
- Affymetrix CEL files - these files of probe level data can be viewed graphically in geWorkbench but not used directly for analysis.
- Other
- FASTA files. DNA or amino-acid sequence files in FASTA format.
- PDB files - protein 3-dimensional structure files can be viewed in the JMol Viewer in geWorkbench.
- NetBoost Edge List - used by a component still under development.
Details of the geWorkbench Affymetrix File Matrix
This file format is proprietary to geWorkbench. It contains the data from any number of arrays in a spreadsheet-like "matrix" format. It also allows for the group of arrays into named sets based on phenotypic criteria. Multiple such groups can be defined, each containing a different division of the arrays among named sets.
geWorkbench can create files in this format from data read in in other formats.
There are two data columns for each array, signal and confidence. The confidence value can either be a p-value or an Affymetrix present/marginal/absent (P/M/A) call. The format is difficult to create by hand because the descriptive lines containing array names and phenotype groups contain only a single column per array, whereas there are two data columns per array. That is, data columns are not directly labeled by their header lines.
The file is tab delimited.
- The first line begins with the word "AffyID", then the word "Annotation" in the second column. Columns 3 and on contain the array names.
- There can be any number of phenotypic groups on the following lines, each beginning with the word "Description", followed by the name of the group in the second column. Columns three on contain the particular set label for each array.
- After the Description lines, if any, the remaining lines contain the data matrix. The first column contains the marker name (Affy ID). The second column can contain annotation information. However, annotations can also be read in from a separate annotation file (Affymetrix CSV format). The remaining columns contain, as explained above, the signal and confidence values for each array.
The basic format is as follows:
AffyID	Annotation	ArrayName1	ArrayName2	ArrayName3	ArrayName4	etc...
Description	GroupA_Name	setNameA1	setNameA1	setNameA2	setNameA2	etc...
Description	GroupB_Name	setNameB1	setNameB1	setNameB1	setNameB2	etc...
markerID1	"some annotation"	expression1-1	confidence1-1	expression1-2	confidence1-2	etc...
markerID2	"some annotation"	expression2-1	confidence2-1	expression2-2	confidence2-2	etc...
etc...
Microrray data and merging datasets
When working with microarray data, all data to be analyzed must be present within one data node in a project. If the data exists as multiple files containing results from single arrays, the data must be merged into a single node before it can be used. geWorkbench can perform this merging step either at the time data is read in, or later in a separate step. Once merged, such a dataset can be saved to disk; it will be saved in the geWorkbench matrix file format.
Data merging will be covered in the local and remote data tutorials.
Tutorial: Working with Projects
Creating a new project
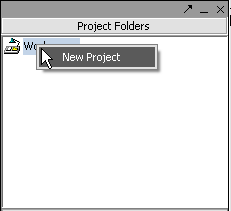
All data must belong to a project. Right-click on the Workspace entry in the Project Folders window at upper left to create a new project.
Renaming a project
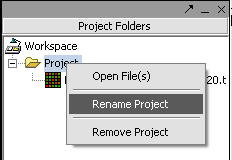
1. Right-click on Project folder.
2. Select Rename.
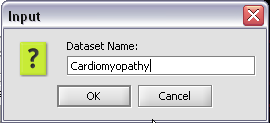
3. In the pop-up screen rename your project.
4. Click on the OK button
Renaming a project data node
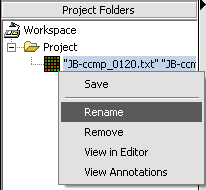
1. Right-click on a Project Folder data node.
2. Select Rename.
3. In the pop-up screen rename your data node.
4. Click on the OK button.
Removing a project
1. Right-click on Project folder.
2. Select Remove.
Removing a project data node
1. Right-click on the data node.
2. Select Remove.
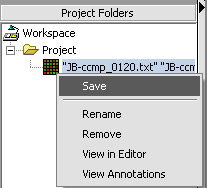
Saving a data node to a file
It is here that, among other things, you can create the matrix multi-experiment file format used by geWorkbench from a merged dataset.
1. Right-click on data node that you want to save.
2. Click Save.
A standard file Save screen will come up.
3. Choose a location.
4. Enter a name.
5. Click on the Save button.
